workshop-nodeconfeu2018
Step 2 - Advertising
The most basic part of Bluetooth LE is advertising. So a device can be ‘found’ and connected to (eg. appear in the ‘Web Bluetooth’ dialog), it broadcasts a short message (31 bytes!) about itself. It does this a few times a second - there’s no kind of delivery response, so the packets can get lost - but eventually some will get through.
It’s a nice, easy, unauthenticated one-to-many way of transmitting data. Apart from security, the only downside is that the receiver needs to keep listening on the radio for packets, which uses a lot of energy.
I’ve set up a device that broadcasts its name as ENV, along with the current Temperature and Humidity.
UUIDs
We only have 31 bytes - that’s not a lot - in fact the whole of Bluetooth LE is a bit constrained. As a result, the folks defining the spec decided to do something to save space:
Pretty much everything in Bluetooth LE is described by a UUID. Common things,
or things that people are willing to pay a lot of money to the Bluetooth SIG
for are described by nice, compact 16 bit UUIDs. There are also 32 bit UUIDs that
nobody uses much, and finally there are 128 bit UUIDs - which are completely free.
Create a randomish number (date|md5sum), and you’re good to go.
However 128 bit UUIDs are 16 bytes. This isn’t a big deal for an actual connection, but in advertising you rarely want to use up over half of your 31 byte budget - so for this example we’re staying with some predefined 16 bit UUIDs. See the note right at the end about Manufacturer data.
So - how do we see this data? Unfortunately while there is an addition to the spec in development, Web Bluetooth doesn’t yet let you read data from devices advertising it.
Use your phone
(Optional…) Go to your Phone’s app store and search for NRF Connect by
Nordic Semiconductor. This is an app created to help you debug Bluetooth LE devices.
- Start it, make sure
Scanneris selected, and hitScanup the top right. - You should see a whole bunch of devices that are owned by people in the room
- You should see a device called
ENV(you can also filter by name if too many devices appear). - Tap on the device, and you should see information about it reported - including
the Temperature (which the app can decode) and Humidity as
0x2A6F(which it can’t).
Use your Badge!
Since you’re hopefully still connected to your badge, you can ask it to scan for devices. There are a few ways to do this….
NRF.setScan(callback(device), options)will call a function for every received advertising packet.NRF.findDevices(callback(devices), options)will listen for a set interval (2 secs default) and will call the function with all the devices found.NRF.requestDevice(filter) => promise(device)is Espruino’s version of the Web Bluetoothnavigator.bluetooth.requestDevicewhich we’ll come to later. It finds one device matching the filters, and completes the promise with it.
Given we’re in a room with a million Bluetooth LE devices, to make things easy
we won’t use the first two functions. We’ll use requestDevice, which is fast
and efficient.
Copy the following code and paste it on to the left-hand side of the IDE.
NRF.requestDevice({filters:[{name:"ENV"}]}).then(device => {
  console.log("Found device");
  console.log(device);
}).catch(err => {
  console.log("There was a problem!", err);
});
You may see this (after a few seconds delay):
>NRF.requestDevice(...
=Promise: {  }
There was a problem! No device found matching filters
Which means that during the 2 second period of searching for devices, nothing was found. Just use up-arrow to recall the previous command and enter to execute and try again.
Everything going well, you should see something like this:
>NRF.requestDevice(...
=Promise: {  }
Found device
BluetoothDevice: {
  "id": "c0:03:88:c9:0d:ec random",
  "rssi": -29,
  "data": new Uint8Array([2, 1, 5, 5, 22, 110, 42, 157, 9, 5, 22, 111, 42, 86, 17, 4, 9, 69, 78, 86]).buffer,
  "name": "ENV",
  "serviceData": {
    "2a6e": new Uint8Array([157, 9]).buffer,
    "2a6f": new Uint8Array([86, 17]).buffer
   }
 }
idis the MAC address of the device (there are different types of MAC address,random(locally unique) andpublic(unique in the world) - but we don’t cover that here)rssiis the signal strengthdatais the raw advertising data that was received.nameandserviceDataare decoded data from the raw advertising packet.
serviceData contains the 16 bit Characteristic UUIDs
defined by the Bluetooth SIG, along with the data from them.
So, how do we get at our data? It’s already been partially decoded for us into
an ArrayBuffer. All we need to do is use either a DataView or Uint16Array to
decode it into a 16 bit value again, and divide by 100:
NRF.requestDevice({filters:[{name:"ENV"}]}).then(device => {
  // Sanity checks
  if (!device.serviceData ||
      !device.serviceData["2a6e"] ||
      !device.serviceData["2a6f"]) {
    console.log("Corrupt advertising data");
    console.log(device);
    return;
  }
  // decode into an object
  var hum = {
    temperature : (new Uint16Array(device.serviceData["2a6e"]))[0]/100,
    humidity : (new Uint16Array(device.serviceData["2a6f"]))[0]/100
  };
  // display what we got
  console.log("Found device");
  console.log(hum);
}).catch(err => {
  console.log("There was a problem!", err);
});
Copy and paste into the left-hand side of the IDE and it’ll produce:
> ...
=Promise: { }
Found device
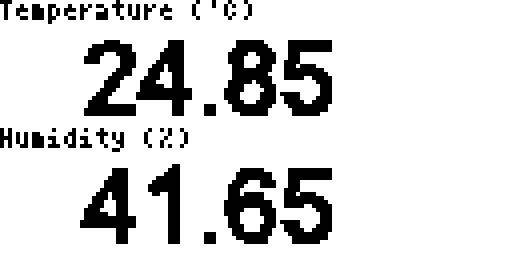
{ "temperature": 24.87, "humidity": 43.94 }
Finally, we can wrap it all up in a function, write the data to the LCD,
and then call it every 10 seconds using setInterval, and we have our
own weather station!
You can copy/paste this code to the left-hand side too, or you can use the right-hand side and upload.
function scan() {
  NRF.requestDevice({filters:[{name:"ENV"}]}).then(device => {
    // Sanity checks
    if (!device.serviceData ||
        !device.serviceData["2a6e"] ||
        !device.serviceData["2a6f"]) {
      console.log("Corrupt advertising data");
      console.log(device);
      return;
    }
    // decode into an object
    var hum = {
      temperature : (new Uint16Array(device.serviceData["2a6e"]))[0]/100,
      humidity : (new Uint16Array(device.serviceData["2a6f"]))[0]/100
    };
    // display what we got
    g.clear();
    g.setFontVector(20);
    g.drawString(hum.temperature, 20,8);
    g.drawString(hum.humidity, 20,40);
    g.setFontBitmap();
    g.drawString("Temperature ('C)", 0,0);
    g.drawString("Humidity (%)", 0,32);
    g.flip();
  }).catch(err => {
    // There was a problem - we don't care as we expect it sometimes...
  });
}

setInterval(scan, 10000);
scan();
Want to use Node.js to read the data? There’s some info about it here
Do how do you broadcast?
Most devices don’t have a Humidity sensor, so I used a Nordic Thingy:52 running Espruino - however the same applies to any device.
All you need to do is call NRF.setAdvertising(...)
with the services and data you wish to advertise (note that everything must
be a byte array. If you supply a string, it’ll be converted to a byte array
for you).
The code used is just as follows:
// Get humidity/temp readings from the Thingy
Thingy.onHumidity(function(hum) {
  // Bluetooth spec says data is 16 bits, 0.01/unit - so x100
  var t = Math.round(hum.temperature*100);
  var h = Math.round(hum.humidity*100);
  // Set advertising data and name
  NRF.setAdvertising({
    0x2A6E : [t&255,t>>8],
    0x2A6F : [h&255,h>>8],
  },{
    name:"ENV",       // change the name
    connectable:false // don't allow anyone to connect
  });
});

function onInit() {
  NRF.setTxPower(4); // Highest transmit power
}
You can do exactly this kind of thing on your Badge as well, but note that Advertising only works when then badge isn’t connected to your PC, which makes it slightly more frustrating for a workshop!
A note on Advertising data
Looking at the data we’d received, we have:
[2, 1, 5, 5, 22, 110, 42, 157, 9, 5, 22, 111, 42, 86, 17, 4, 9, 69, 78, 86]
The data is decoded as a series of:
- Byte Length (excluding the length)
- Type of data from this list
- Actual data
So the data above decodes as:
[2, 1, 5,  // 2 bytes, Bluetooth LE flags
5, 22, 110, 42, 157, 9,  // 5 bytes, Service Data, 0x2A6E + 2 bytes temperature
5, 22, 111, 42, 86, 17,  // 5 bytes, Service Data, 0x2A6F + 2 bytes humidity
4, 9, 69, 78, 86 ] // 4 bytes, Name, E..N..V
You’re only supposed to use the Bluetooth SIG provided 16 bit UUIDs for service data (and we have abused that somewhat by sending temperature and humidity characteristic UUIDs). You can however make your own 128 bit UUIDs as described above, but we have only 31 bytes of advertising data in total!
Obviously in that case Service Data is not ideal - so you can specify ‘Manufacturer Data’, which
uses a 16 bit UUID which you can get for free, but by registering with the Bluetooth
SIG. Espruino has it’s own - 0x0590. See NRF.setAdvertising(...)
for an example of using it.
The only reason we’re not using it for this workshop is that we’re currently using
0x0590 on your badges to report ‘Clapometer’ for the conference, so we’d
prefer it wasn’t used in the workshop!